Six-wheel drive vehicles in PhysX

Vehicles with six wheels are interesting. They perform well in rough terrain, they can handle heavy loads and they look cool! I am working on a six-wheeled vehicle for Project Slide and it’s really fun to drive. It also handles distinctly different than all the other (four-wheel) vehicles already in the game, which is nice.
Implementing six-wheel vehicles comes with a set of new challenges though, and in this blog post we’ll look at one which can become a problem with so called six-wheel drive (6x6) vehicles, ie. vehicles where all six wheels are driven by the engine.
The image on the right shows the prototype 6x6 vehicle. It is using the chassis of the old Car1 and the wheel models of Car2 but they will be replaced with other models later. For now, we are focusing on the physics side of things.
Project Slide is not a serious simulation, ie. it does not try to be as realistic as possible. Instead, it focuses on fun gameplay and action. We can take shortcuts when it benefits the gameplay or simplifies the creation of the game. However, the vehicles in the game are simulated to the extent the PhysX vehicle SDK allows. Eg. the vehicle moves due to the tire force generated when the wheels rotate while in contact with a surface. The gameplay code does not tell the vehicle to move. Instead it tells the vehicle to switch to a forward gear, release the brake and apply acceleration, which causes the vehicle to move. I believe using a somewhat realistic vehicle physics model allows for lots of interesting sandbox-like gameplay and allows us (the creators) as well as you (the players) to reason about a vehicle’s performance the way we would for a real-world vehicle.
PhysX vehicle types
Let’s see what kind of PhysX vehicle to use for our new 6x6 vehicle. PhysX supports four different vehicle types out-of-the-box:
- PxVehicleDrive4W: This type is designed specifically for simulating four-wheeled vehicles. It has all kinds of bells and whistles like Ackermann Steering Correction and Limited-slip Differentials and it is generally the best type if you want to simulate a four-wheeled vehicle. It does support more than four wheels, but only the first four of those can be driven (ie. connected to the engine) so it won’t work for our 6x6 vehicle. So far, all cars in Project Slide have used this vehicle type.
- PxVehicleDriveNW: This type supports up to 20 driven wheels, but with the limitation that the engine torque is always divided equally among the driven wheels. This can become an issue as we’ll see later on, but otherwise this is a good candidate for our vehicle.
- PxVehicleDriveTank: The name says it all. This type is for simulating tracked (tank-like) vehicles, eg. vehicles where all the wheels on the left or right side rotate at the same speed so that they can be connected with tracks. For our 6x6 vehicle we want to steer by turning the front wheels so this type is not suitable.
- PxVehicleNoDrive: This type also supports 20 wheels but it comes without any kind of drivetrain. The user is free to implement the drivetrain themselves or they can use it without one. All trailers in Project Slide use this kind of vehicle type since they don’t have an engine, only brakes.
I decided to use the second option, PxVehicleDriveNW, for the 6x6 vehicle. I wanted to use the same engine, clutch and gearbox logic as for the four-wheeled vehicles and the PxVehicleDriveNW type allows me to do that. That, in turn, allows me to use the same kind of data files for setting up and tuning the vehicle type as for all the other vehicles which is nice in the long run.
The PhysX vehicle SDK makes setting up the vehicle pretty straightforward. Essentially, the only new thing I need to do is to tell the system where the new wheels are to be placed, if they turn left/right when steering, if handbrake affects them and some other small details.
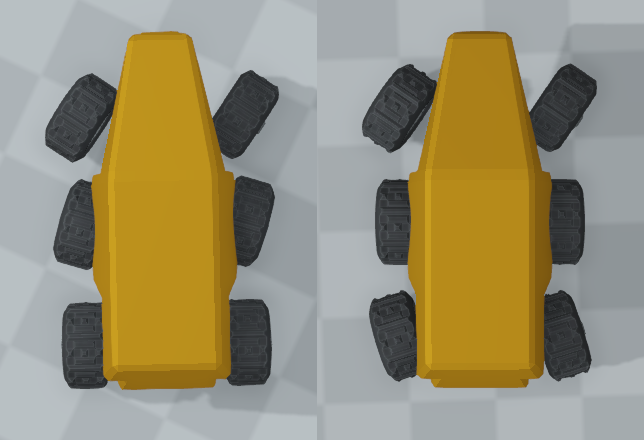
When setting up a six-wheeled vehicle you have (at least) two options to choose from when deciding which wheels should be steering (see image on the left). In the version on the left the four front wheels are steering. This makes the vehicle handle a little bit like a four-wheeled vehicle. In the version on the right the two front and two back wheels are steering. This makes the vehicle turn more sharply since the turning pivot is moved closer to the middle of the vehicle. I wanted the prototype 6x6 vehicle to be relatively fast, so I went with the version on the left. The other version tends to be quite difficult to steer at high speeds.
Differential problems
So far so good. I got the vehicle up and running quickly and generally everything worked out fine. Sometimes, however, the vehicle got stuck when driving on uneven terrain. This was unfortunate since one of the major selling points of the six-wheeled vehicle was to be able to drive in all kinds of terrain.
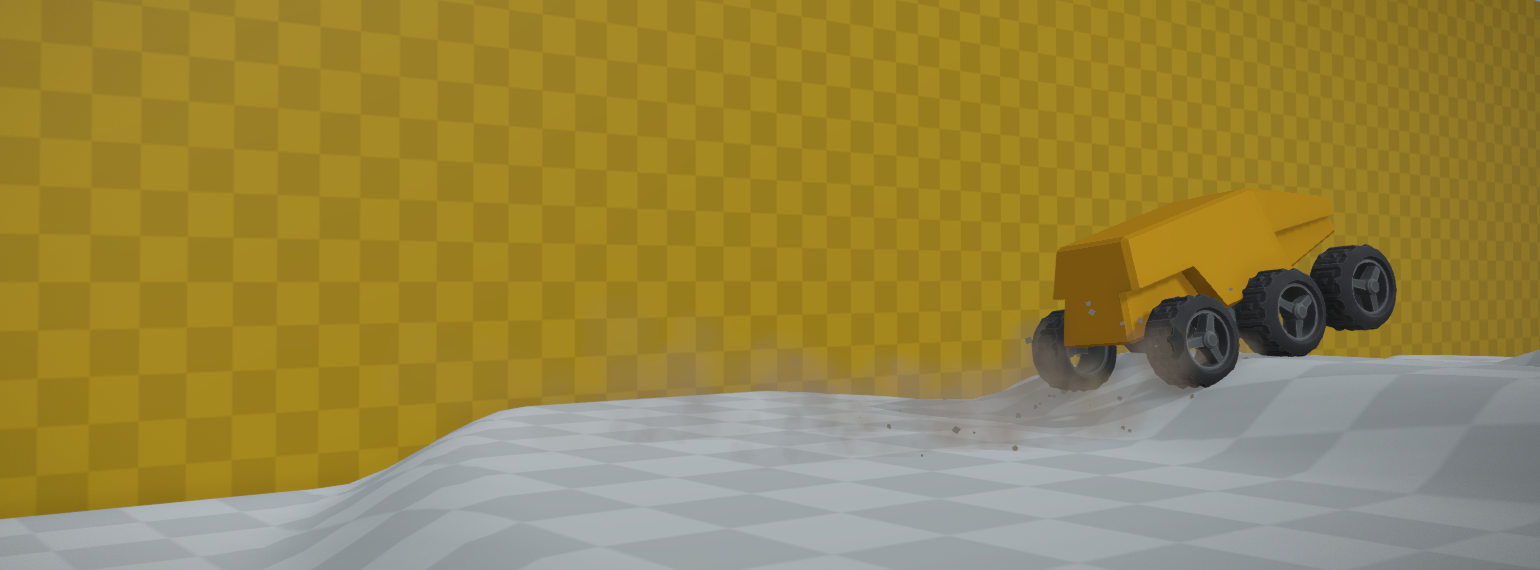
Let’s look at why this happens. Check out the image below. The wheels on the middle axle aren’t touching the ground since the whole vehicle rests on the front and rear axles. When accelerating, the middle wheels (ie. the ones without any traction) start spinning rapidly while the front and rear wheels (where all the traction is) are almost still. This is because of that PxVehicleDriveNW limitation mentioned earlier; the torque is divided equally among all wheels.

Situations where one or more wheels are in the air can occur with four-wheeled vehicles too (although they tend to be more common with six-wheeled vehicles) so why is this not a problem for the other vehicles in the game? Remember that four-wheeled vehicles can use the PxVehicleDrive4W vehicle type which supports Limited-Slip Differentials (LSDs). Explaining how an LSD works is out of the scope of this blog post but there are excellent videos available for those who want to know more.
To understand the rest of this post, all you need to know about LSDs is that they deliver more torque to the wheels that have good traction, while the ones with less traction (eg. because they are on a slippery surface or in the air) receive less torque. This would solve our problem above as most of the torque would be delivered to the front and rear wheels, allowing the vehicle to move. However, as previously mentioned PxVehicleDriveNW (which we use for the 6x6 vehicle) doesn’t support LSDs, so we have to make a better differential ourselves.
My knowledge of differentials is not perfect. If I have missed something, don’t hesitate to point it out in the comments below.
Torque vectoring
Torque vectoring is the term used to describe the technology which allows modern vehicles to dynamically adjust the torque to each wheel on the fly. An electronic control system monitors the performance of the vehicle and controls how the available torque should be divided among the wheels. In the real world this type of system is extremely complex and difficult to construct. Luckily, in the video game world we aren’t quite as constrained by the laws of physics. We can simply assign a portion of the torque to a given wheel by assigning a value to a variable. I came up with a very simple torque vectoring differential for the 6x6 vehicle. It works like this:
- All the wheels that are in the air get an extremely small (adjustable) amount of torque.
- The rest of the torque is divided among the wheels that are touching the ground.
- Each wheel get a torque proportional to the suspension spring force acting on that wheel.
- If too many wheels are in the air (also adjustable), disable the torque vectoring completely.
The result can be seen in the video below.
As you can see in the video, it is quite easy for the vehicle to get stuck when torque vectoring isn’t used. After turning on the torque vectoring logic I try to get stuck in the same places as before, but it simply isn’t happening anymore. The differential works very well!
Implementing the differential
Implementing the differential was fairly straightforward once I knew how I wanted it to work. There was one small problem though; PhysX doesn’t allow the user to override the torque ratios for vehicles of type PxVehicleDriveNW. Luckily, most of the PhysX source code is available on GitHub, under a 3-clause BSD license, which means we can add that functionality ourselves. I don’t like having to do this. There is always the possibility of something breaking, plus it makes updating to a newer version trickier, but in this case I think it was worth it.
If you are interested, I have a fork of PhysX 4.1 available on github where the overridden torque ratios can be given to the vehicle. Reverting to the standard behavior is as easy as setting a bool to false. This is done quite often even when the torque vectoring is enabled since we don’t always have enough wheels touching the ground to distribute the torque in a sensible manner, eg. when the vehicle temporarily jumps into the air.
Here is the code for the torque vectoring:
|
|
The mDriveDynData.mOverriddenTorqueRatios and mDriveDynData.mTorqueRatios members are the ones we added to PhysX in our custom fork. One thing to keep in mind is that since we are working with ratios, the total applied torque should always be 1. This is one reason why we disable the torque vectoring when enough wheels have been lifted off the ground. Otherwise the wheel(s) remaining on the ground whould get almost all the torque available which could cause the vehicle to jerk unexpectedly. The logic currently doesn’t handle traction lost due to slippery surfaces but that can be added later if needed.
Conclusion
This is just one of many similar issues you have to deal with when creating a game largely powered by a physics simulation. Considering how short and simple the torque vectoring code ended up being, I think this is a nice way to handle the problem. I will keep working on the 6x6 vehicle and I hope to have the design finished soon. Stay tuned!