Ramblings about video game AI - Part 3 - Navigating the game world
This blog post is part of an ongoing series about video game AI. See the first part here and the second part here.
There and Back Again

Navigating the game world is one of the most complex tasks required by AI agents in a game. To give the illusion of independent, intelligent entities, the agents must act intelligently when moving around. They should move in a way that fits their current task, however, often we don’t want the AI to take the 100% optimal path because we don’t want them to act like robots.
In this blog post we’ll look at AI navigation in Project Slide. Terms like “navigation” and “pathfinding” are used somewhat interchangeably among people working with gamedev, and they generally mean a set of tools and systems enabling AI agents to reason about their surroundings so that they can make decisions about where to move, which way to go to get there, how to behave while moving there, which places are accesible to them and so on.
In the context of Project Slide we are talking about AI agents driving around the game world in vehicles. Here are some things we want the AI drivers to handle:
- When driving to a destination, the agent should choose a somewhat optimal path to get there.
- If there are obstacles in the way, the agent should avoid colliding with them. This includes moving obstacles, such as other vehicles.
- If there are dangers along the way, the agent should try to avoid them. Eg. when approaching a sharp turn on a cliff, the agent should slow down.
- The agent should choose easier or more suitable routes if possible. Eg. it should choose roads over uneven terrain even if it makes the route a little bit longer.
- The agent should take the characteristics of their own vehicle into account. Eg. it should avoid narrow places where it might get stuck.
- If the agent gets stuck, it should try an alternative approach. Eg. if the vehicle drives into a tree, it should reverse and drive around it.
Nav meshes
To be able to drive from one position to another, the AI agent needs to know the path to take. One popular way to calculate that path is by using something called a Navigation Mesh, or nav mesh. The nav mesh is a polygonal mesh which is cast onto the game level, usually as a pre-processing step during development but nav meshes can be generated on the fly as well. After the mesh has been created (or during the creation) certain parts of the mesh are removed. The end result is a mesh that covers the walkable (or drivable, jumpable, swimmable etc.) areas, but not the areas considered to be blocked or impassable. Certain polygons of the mesh can be marked with special flags which are relevant to the game. For example, polygons covering a piece of road might be marked with an asphalt ID while polygons covering a muddy area can be marked with a dirt ID.
When the game is running the agent can run pathfinding queries against the nav mesh to find out facts about the environment. For example, the agent can run a query which returns a path from point A to B, and the query will succeed as long as the nav mesh covers both points as well as every step along the way. That means that agents won’t be able to “jump” from cliffs onto the ground, in the image above, even though parts of the rocks are covered by the nav mesh. This is because the agents would need to leave the nav mesh temporarily during the jump. This kind of behavior can be added later though custom logic, if required by the game design.
The agent can also run other kinds of queries against the nav mesh. Remember the behavior tree node called “FindRandomPointOnNavMesh” in the previous part? As the name suggests this node performs a nav mesh query and returns a random point on the nav mesh, within a given distance from a reference point. Typically the agent can filter areas in the queries too, eg. in order to choose a path or position that only touches certain polygons. One such query could be “Return a path from point A to B which does not cross any rivers.”
Navigation middleware
Generating nav meshes efficiently is quite complicated. While you can certainly write the code to do it yourself, this is one area where most people use a 3rd party tool or library. There are a few commercial solutions available. PathEngine has been around for a while and it has been used in many commercial games. A fairly recent addition to this family of middleware is Mercuna. This one is interesting because it performs the pathfinding queries in full 3D, while most other solutions tend to project the space onto layers of 2D spaces and perform the queries on them. Doing the calculations in full 3D should allow flying AI agents to navigate the game world more efficiently. Additionally, Mercuna could be interesting for Project Slide because they have a solution specifically tailored towards vehicle navigation.
The navigation middleware currently used by Basis (and by extension, Project Slide) is a duo of open source libraries called Recast and Detour. While not necessarily as full-featured as some of the commercial products, Recast and Detour are hands-down the best free options available right now. The libraries can feel a bit daunting at first, due to a lack of good documentation, but luckily the sample code is easy to understand and the community is friendly and helpful. Recast provides functionality for generating nav meshes while Detour is all about running queries on those meshes. The samples show how to use the two pieces together.
Engine integration
The Basis engine has had a very basic Recast/Detour integration for a long time. Essentially you have been able to generate a nav mesh covering the entire level and perform simple queries on it, such as how to get from point A to B. This is not enough for a full game, such as Project Slide, for a few reasons:
- We don’t necessarily want the nav mesh to cover the whole level. In a typical level the player is only able to traverse certain parts of the geometry which means there is no point in having the nav mesh cover the whole level. In fact it can lead to navigation bugs.
- We have moving objects, such as vehicles, that need to be taken into account when navigating the game world. If vehicle A is stationary and it blocks the entrance to a tunnel, vehicle B needs to know not to drive into it. However, if vehicle A is on the other side of the level, moving at a high speed, vehicle B probably don’t need to try to avoid it since it will have moved by the time the vehicle B gets there.
- As previously mentioned, we need a way to mark areas on the nav mesh. Eg. a vehicle should prefer driving along a road if there is one nearby, even if it means the path will be a bit longer.
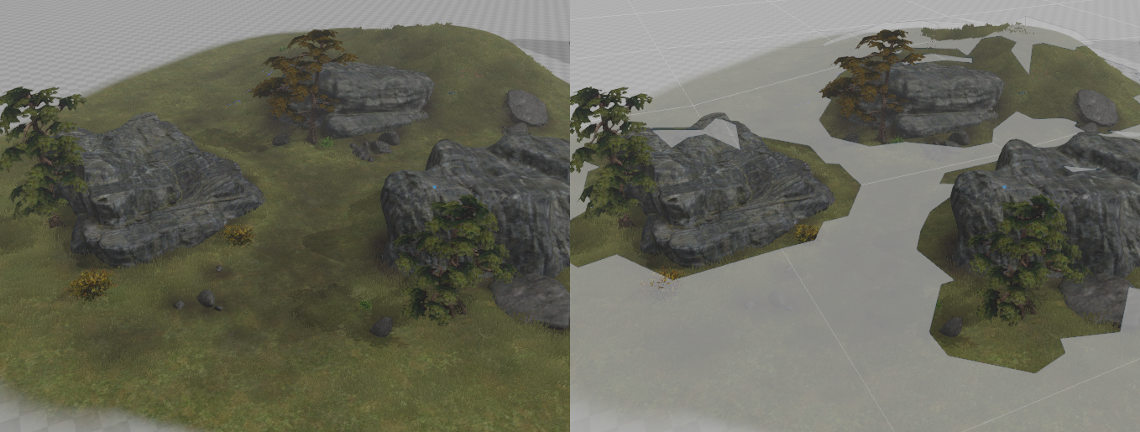
With these things in mind I set out to improve the nav mesh system of the Basis engine. Previously you could only have a single nav mesh per level, covering all geometry. With the new system you can have several nav meshes, each with their own bounds. The image below shows a nav mesh covering only a portion of the level. The yellow lines show the bounds of the nav mesh.
You might be wondering, why are parts of the hill on the right not covered by the nav mesh? That is because those slopes are considered too steep to drive up. There are a bunch of parameters you can adjust when generating the nav mesh which help to make sure the resulting mesh fits the kind of agents you use.
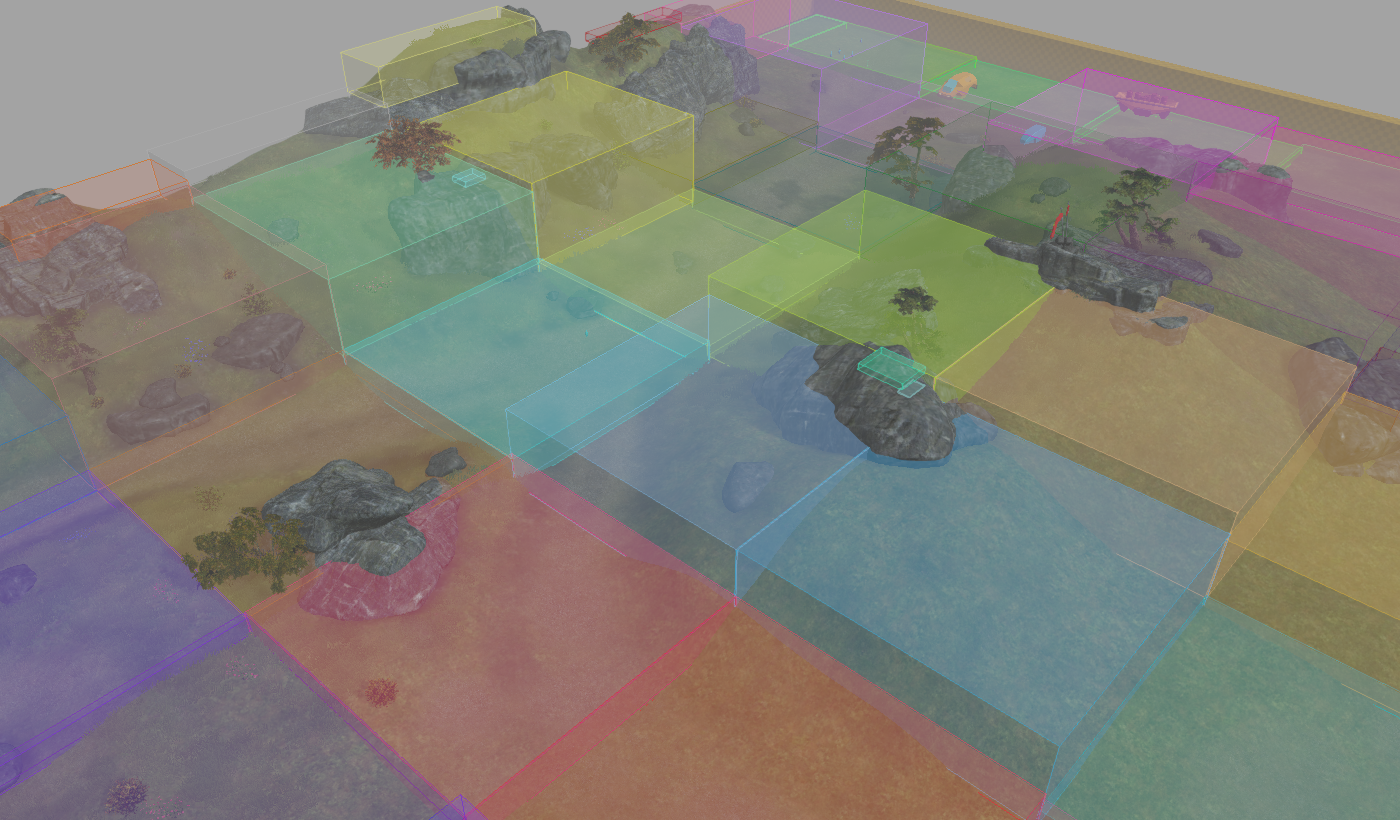
Next, I split the nav mesh into tiles, ie. smaller parts that can be updated without having to regenerate the entire mesh. This is very important for dynamic/temporary nav mesh obstacles, as we’ll see later. Recast and Detour thankfully makes it reasonably easy to split the nav mesh into tiles and there is a sample showing how to do it. The image below shows the nav mesh tiles, each one drawn with a distinct color.
Marking areas on the nav mesh with specific IDs was the next thing on my list. Recast allows up to 64 different area types on a single nav mesh. Each polygon on the nav mesh is assigned an area type. Not knowing exactly what I will need in the future, I made up the following types: Ground, Water, Road and Dirt. Ground is the default type and any polygons not explicitly marked will get this type automatically assigned. Water is to be avoided by the AI agents at all costs. They should favor any nearby roads, especially when driving long distances. The dirt type is meant to be used for areas that are a bit more difficult to navigate, to help the AI drive around them if possible. One cool thing about Detour is that the user can specify per-query costs for each area type. This means that one AI agent can request a path which avoids dirt areas while another one requests a path which favors them, even if the two agents are using the same nav mesh.
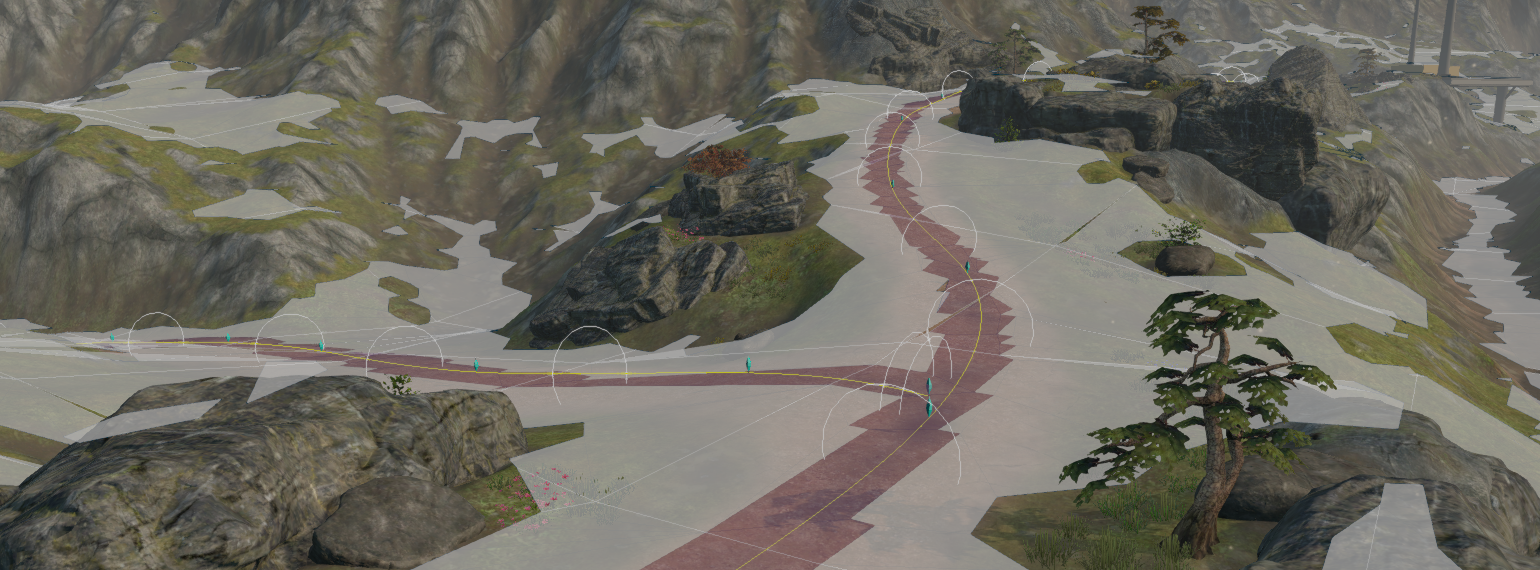
I added two new object types to the level editor for laying out these areas on the nav mesh, the NavMeshArea and the NavMeshAreaPath. The area covered by a NavMeshArea is specified as a bounding box which can be placed and rotated to fit the area the user wants. The NavMeshAreaPath follows a spline path and is very useful for designing roads, rivers and other path-like areas. The image below shows a road path in the level editor. The white circles shows the “thickness” of the path.

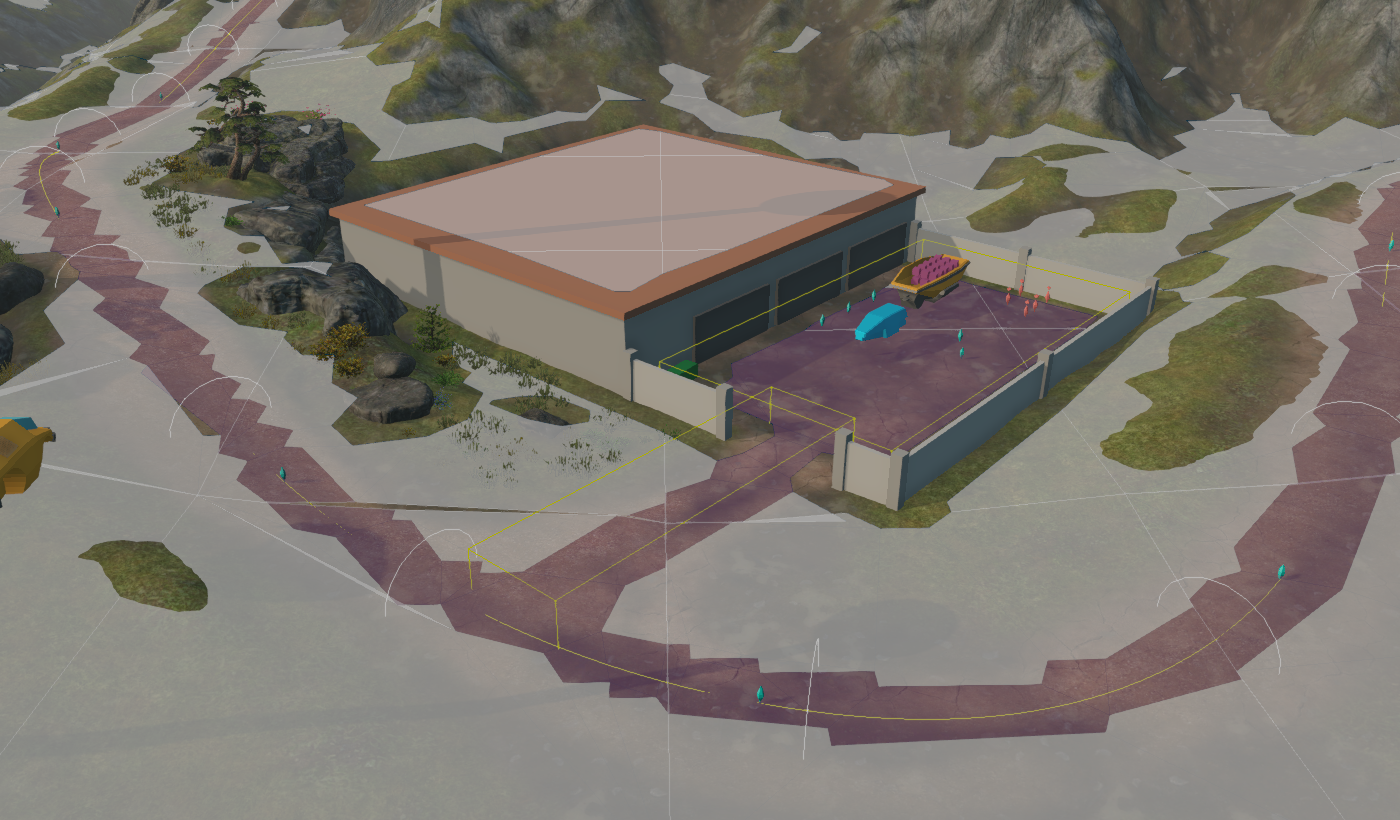
NavMeshAreas and NavMeshAreaPaths can be used together to “paint” the areas however the user wants. The image below shows a NavMeshAreaPath used for the road and two NavMeshAreas (the yellow boxes) used to mark the parking space and the path leading to it. The red parts of the nav mesh are the polygons marked with the Road area type.
Moving obstacles
Moving obstacles turned out to be one of the more challenging parts of the navigation system. A moving obstacle in Project Slide can be everything from a barrel or a box to a truck hauling a large trailer. The AI needs to be aware of these obstacles when moving around, however, not all obstacles are equal. If a large vehicle is blocking the path it is absolutely vital that the agent knows about this. On the other hand, if a barrel rolls into the path of an AI agent it probably is not that bad if it simply runs into the barrel, sending it flying.
Recast and Detour don’t really support moving obstacles. They do, however, support temporary obstacles through a helper class called the Tile Cache. This is where the nav mesh tiles we looked at earlier come into play. The user can register a temporary obstacle with the tile cache and Detour will regenerate only the affected tiles, essentially cutting a hole into the nav mesh. This, in turn, will make all AI agents aware of the obstacle. However, as previously mentioned moving obstacles aren’t really supported, only temporary obstacles. The naive solution would be to simply remove an obstacle and add it back at its new position whenever it has moved but this would result in a massive number of regenerations of the nav mesh, the vast majority of which would be completely unnecessary. If an obstacle moves 10cm it does not affect any AI agents half a kilometer away. The solution I came up with was:
- If an object is marked as a dynamic nav mesh obstacle, it touches the nav mesh and its velocity is low enough, it is added as an obstacle.
- If the object moves far enough from where it previously was added it is removed and added back at the new position.
- If the object’s velocity is above a certain threshold it is removed as an obstacle and is not added back until the velocity falls below the threshold again.
Currently the minimum distance an object has to move to have its nav mesh obstacle updated is one world unit (ie. one meter) and the velocity threshold is 5.55555 m/s (ie. 20 km/h). With these values with get something like the video below:
As long as the vehicle moves slowly enough it cuts a hole into the nav mesh, making other agents avoid it. If it moves fast enough it is removed. As you can see from the video, this includes the trailer and the cargo as well. The idea is that if an object moves fast enough it shouldn’t affect nav mesh queries or the resulting paths, because by the time the agent arrives at the obstacle it will have moved elsewhere.
This turned out to be quite tricky to implement. Detour has a system where obstacles are added/removed to/from the nav mesh in batches, which is a good idea. However, you need to be careful not to overflow the buffers reserved for the batches. Also, I ran into some issues where obstacles not touching any tiles (eg. an object placed in the editor in the air) would cause resource leaks. In the end I wrote a layer on top of Detour which handles these cases + takes care of moving obstacles on the nav mesh when the object has moved far enough, removes obstacles with high velocities etc.
You might be wondering, if fast-moving objects aren’t marked as obstacles on the nav mesh, how do two fast-moving vehicles avoid head-on collisions if they can’t see each other? For these cases they use a separate “whisker” system. Basically, the agents fire raycasts in specific directions and react by performing evasive maneuvers if the rays hit other objects. We’ll cover that system in a later part. This part is already getting long.
Putting it all together
Allright, so how does all of this look when the parts are put together? Here is a quick example of an AI agent (the blue car on the left) being asked to drive from point A to B. In the first image we don’t give any specific cost to any of the areas, which means that the agent will take the shortest route available. The path is drawn as green points and yellow lines.

As you can see in the image above, the AI agent takes a shortcut over the grass in the beginning of the path. The next image shows what happens if we give the road area a lower cost than everything else. The start and end points are still the same.

Now the agent tries to stay on the road as much as possible. Below is a video of the agent driving along the road. The camera is attached to the vehicle just like it is for the player, but the AI is still driving.
The agent handles the path quite well even though there are lots of rocks along the road and the road material is a bit slippery, ie. gravel. However, you can see the car bumping into a rock at one point. One reason for this might be that the road path needs to be adjusted near that rock. Another reason might be that the vehicle was driving too fast, which gives us a nice segway into the next topic, future work.
Future work
There are a few factors affecting the speed of an AI agent as it is driving through the game world. The agent analyzes the path it has to take and lowers the speed near sharp turns. The agent also has a “movement profile” which can be changed at any point. These are currently Calm, Normal and Fast. Calm is to be used when hauling cargo and it is meant to make the AI agent drive especially carefully, to keep the cargo from falling off the trailer. In contrast, the Fast profile is to be used during combat or when the agent needs to reach its destination as fast as possible (racing minigame anyone?). However, I have come to realize that these aren’t enough to make the AI handle every case gracefully. I plan to add areas to the nav mesh where AIs are encouraged to drive slower, perhaps because of uneven terrain, cliffs that the agents can fall off etc.
Another missing feature is a nav mesh permutation system. A permutation is simply a different version of the nav mesh which can be enabled/disabled through scripting. Say, for example, that in the beginning of the game a path is blocked by rubble. The nav mesh generation obviously needs to take this into account and cut out the part blocked by the rubble so that AI agents don’t try to run through the blockade. At some point during the campaign the player might have the opportunity to remove the rubble, unblocking the path. At this point the nav mesh permutation system would switch the nav mesh to a version where the path is unblocked, allowing AI agents to use the path.
Finally, one thing which would make the navigation better is if the AI agents took the characteristics of their vehicles better into account when planning paths. Consider the case in the image below. The car is ordered to drive to the yellow sphere, but it is behind the vehicle. Currently the system would simply return a straight path from the vehicle to the sphere. However, the vehicle can’t turn on a dime and so would have to drive around the obstacles instead.
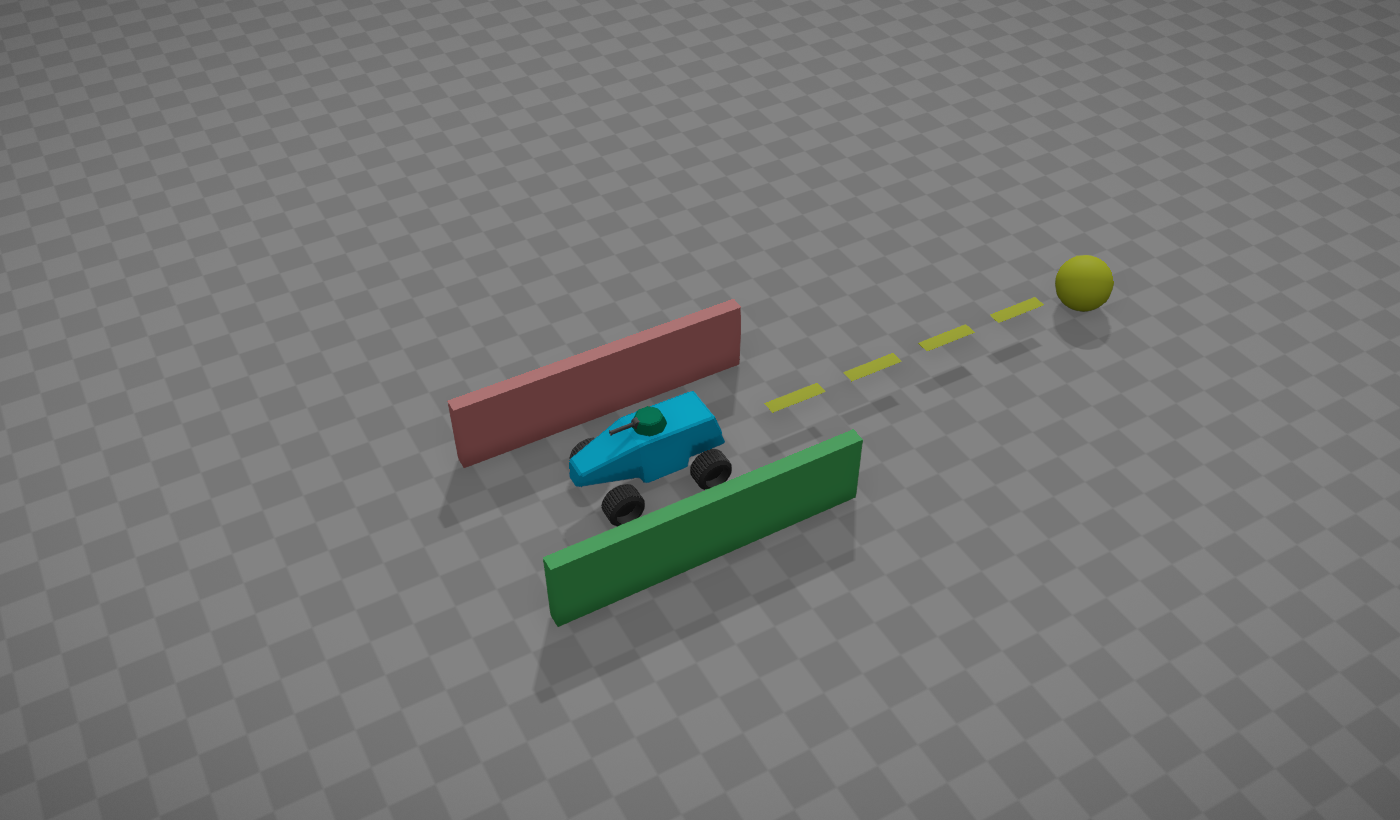
In practice this is rarely a big problem because the agent re-plans its path often enough. The vehicle would start by moving forward (which it does unless there is something in front of it) and after a second or two it would have received a new path to follow. However, it would solve certain tricky problems if the navigation system knew enough about the vehicle (eg. dimensions, turning radii etc.) to return a path that the vehicle could follow without problems. An alternative approach would be to make the driving system more intelligent. In the case above the system would realize that it can simply drive backwards to reach its destination. Simple. However, this particular example is very simple and the cases are often more complicated. Mercuna’s offroad navigation system claims to help with handling these things gracefully, so that might be something to look into.
Up next?
This was a long post, and as usual I hope you found it interesting. I am not sure what to cover in the next part of the AI series. I might delve into the actual driving behavior (ie. how the car decides how much to accelerate, brake and steer) or perhaps look more closely at the combat AI. What would you like to know more about?