How I made Traction Point moddable using Zig and WebAssembly
Traction Point is a sandbox game. Yes there is a campaign with a focus on the story, and yes it has some scripted sequences, but at its core the game is about physically simulated vehicles and how they interact with their environment. The game lends itself well to experimentation and “messing around”, and seeing what works and what doesn’t.
This also applies to the technical side. Since I am building the game using my own Basis game engine, I own the whole tech stack and can release any of the tools I use to make the game to the public, allowing players to create new levels, scenarios, vehicles etc. This can be done without having to touch the game code since the object type system is very data driven. Eg. a new vehicle can be created by telling the game engine the size and shape of the chassis, how many wheels the vehicle should have, what kind of drivetrain, suspension etc it should have, and what chassis and wheel meshes it should use.
This is all well and good, but what if you want to make something more complicated? What if you want a racing game mode complete with lap times, position tracking and scores? Or what if you want to add weapons to the game and make a zombie horde mode? Or you want to have a first-person camera, or make the scout vehicle fly?
To be able to add these kinds of features players will need to be able to create mods containing not only data, but code as well. For Traction Point I came up with a slightly unusal way of making the game moddable. Rather than limiting mod creators to using a scripting language (which is also available, AngelScript can be used to add logic to a level) I expose more-or-less the same engine-level API I use to write the gameplay code for the game itself.
If that sounds a bit extreme, yeah it kinda is. In this blog post we’ll look at how I added modding support to the game, and what I did to make it safe and secure for players to use mods created by someone else. But before we get to that, let’s look at how the codebase for the game is structured.
A hybrid C++/Zig codebase
![]()
As stated above, Traction Point runs on my self-made game engine called Basis, which is written in C++. However, the gameplay code is written in Zig. I won’t go into great detail here about why I chose to use a different language for the gameplay parts, but briefly; I wanted to use a language with a less cumbersome build process and Zig looked cool. At the same time I wanted to benefit from the years of work put into the Basis engine, and so I decided to create an interface through which Zig gameplay logic could be written. As we’ll see later, Zig comes with a number of benefits when it comes to modding.
What is “gameplay code”? Think about all the logic that defines a game, how the camera moves, how it “feels” to move around in the game world, which things in a level hurt you vs. heal you. Basically the code which turns a program into a game. In Traction Point, Zig is also used for the driving AI, the menus and HUD systems, cinematics and so on. The opposite of gameplay code would be engine code, ie. things like allocating memory, threading, reading files off disk etc. In Traction Point these things are written in C++.
The end result is that we have a hybrid codebase where the engine starts up and loads a dynamic library (.dll ) written in Zig. The control is then largely handed to the dll to control the flow of the program.
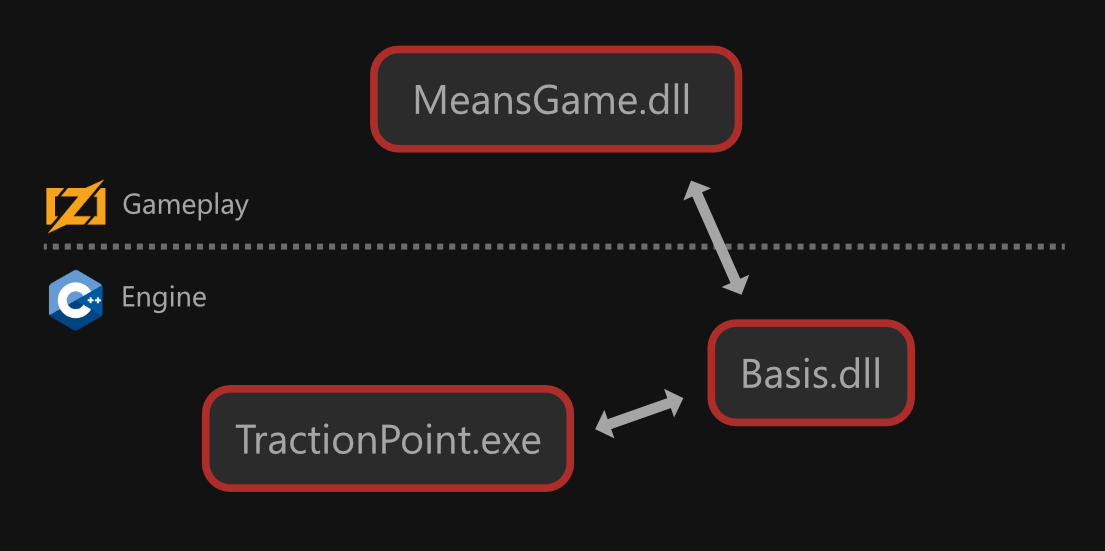
Basis can also be used in pure C++ mode, in which case the gameplay code is written directly into the exe, and core engine functionality is loaded from the core engine library, Basis.dll.
In the case of Traction Point, we have a small launcher exe whose task it is to run the start-up procedure and notify the core engine that we have a Zig library, MeansGame.dll, ready to take over as the game library.
The core engine library loads the game library dll dynamically (ie. using LoadLibrary() on Windows and dlopen() on other platforms) and sends a bunch of function pointers to it, exposing core engine functionality to Zig. After the initial handshake, most of the communication happens between the game library and the core engine library, and the exe simply runs the main loop.
“Means” (of Transport) was the original project name for the game. You’ll see it all over the code, and it simply refers to Traction Point.
Adding mod support
With the above architecture in place, it was surprisingly easy to add support for modding. Instead of loading a single game dll, simply allow the user to specify a list of libraries to load, and then update them all in a loop!
I came up with a basic mod format where each mod has its own folder containing a dll and/or resource packs (.bp4 files).
flyingscout\
    flyingscout.dll # The library containing the code for the mod
    flyingscout_res.bp4 # The resource pack containing the data for the mod
    mod.json # The mod metadata file
Each mod has a metadata file called mod.json containing information about the mod:
{
	"id": "flyingscout",
	"name": "Flying Scout",
	"author": "Madrigal Ltd.",
	"version": "1.0",
	"url": "https://www.madrigalgames.com",
	"description": "This mod adds a flying scout GameObject type called 'Vehicles/FlyingScout'.",
	"env_version": 1
}
I whipped together a simple mod manager using Dear ImGui. The final mod manager menu will come later. The mod manager allows the player to load/unload and reorder mods.

The mod order determines the load and update order of the mods. If you have a mod which depends on another mod you’ll want to make sure you load them in the correct order. The mod manager also has a log which shows information and error messages about mods failing to load etc.
As I alluded to above, one of my favorite things about Zig is the build system, and how easy it is to download the source onto a fresh computer, add zig to your PATH and simply run zig build to produce a binary. This is one of the reasons I think using Zig for modding is so nice. You only need the Zig compiler and my modding SDK, and you can start writing your own mod, perhaps using one of the example mods as a base.
Compare that to the process of building the game engine’s C++ code which involves downloading gigabytes of dependencies, configuring and running CMake scripts, and using Visual Studio or XCode to build the code.
Security concerns
As I am sure many of you know, downloading native code dlls and having the game load them is a bit of a security gamble. We are talking completely unrestricted code here, with access to your harddisk and network connection.
I knew from the beginning this was going to be a concern, and so dll files were never supposed to be the final delivery mechanism for mods. Instead, we want to run the mod code in a sandboxed environment, where it can only do things explicitly exposed to it. No reading/writing of files (because the game engine gives the mod access to game resources in a safe manner) and no opening of network connections (because no mods should ever do that).
However, most games do sandboxed code execution through a scripting language such as Lua, and we already have such a powerful way to add logic through mods. Too powerful one might say. Can we somehow restrict access to the system while leveraging the current modding API? Turns out, yes we can.
Enter WebAssembly
![]()
In my opinion, “WebAssembly” is not a very good name for what is essentially a portable instruction format with built-in security and sandboxing features. The “Web” in the name makes people think that it is only usable “for web stuff”, and indeed, modern browsers have excellent support for exeuting WebAssebly code, but it is useful for so many other things.
For the purposes of Traction Point modding, WebAssembly (wasm) is a portable intermediate format for executing code in a safe and sandboxed way. That means that rather than compiling to something like x64 machine code, we compile the code to a wasm binary module. Wasm code cannot be executed directly but requires a WebAssembly Runtime to execute, just like a scripting language requires a virtual machine. There are a number of WASM runtimes available, and modern browsers come with one built-in.
I went with the WebAssembly Micro Runtime (WAMR), integrating it on the engine level so that loading a wasm module works largely the same as loading a native dll library. How a program interacts with a module via a wasm runtime is very different to how it interacts with a dll though, and I wanted to make the API as similar as possible for both the mod creator as well as for the game/engine programmer (myself) so I had to come up with an interface which hides the differences as well as possible.
How do you compile code to a wasm module? C and C++ can use something like Emscripten, while many newer languages support building to wasm out of the box, and it just so happens that Zig is one of those languages. Again, Zig makes it easy to create mods as you toggle between compiling a dll or wasm module by setting a flag in the build script. Easy!
DLL/wasm differences
Before we continue, let’s go through some important differences between a dll and a wasm module, within the context of a Traction Point mod:
- The wasm module cannot use system functionality such as opening files or network connections (without using something like WASI, which Traction Point does not).
- The wasm module can only read/write memory allocated within the module’s memory space. Eg. it cannot access memory belonging to the game engine unless that memory has explicitly been made available to the module.
- A dll mod communicates with the game engine through function pointers and raw memory. A wasm module must use explicitly exposed functions to communicate with the outside world.
Calling Zig from C++
Let’s look at an example, the client tick() function. Basis uses a client/server architecture (mainly for multiplayer but also in singleplayer mode) and ticking is the fixed-rate update that happens when the game time is advanced. Eg. Traction Point ticks at 60Hz, which can be different from the frame rate. That means that the client, which is part of the C++ core engine, calls the tick() function of the Zig mod library 60 times per second. This is what the function looks like in the mod library:
|
|
Notice the export keyword before the function; that is how both dlls and wasm modules make functions available to the outside world. However, calling the function is very different with a dll vs wasm module. Here’s the dll version:
|
|
Here ClientTickFunction is a simple function pointer, and the game engine can call it directly. Notice that the library checks if this is a mod library or not. If not, this is the main game library and we actually want to call a different function. Let’s now see what the wasm version looks like:
|
|
You can see that we need to do a bit more for the wasm version. First we get the “per-module” data (more on that later). The WAMR runtime wants all parameters packed into an array of 32-bit unsigned ints it calls “cells” so we memcpy() the parameters into into an array called argv . The actual call is made through wasm_runtime_call_wasm() which is part of the WAMR runtime API.
It is important to note here that ZigLibrary::clientTick() and ZigWamrLibrary::clientTick() have the same function prototype, ie. parameters and return value (void). A bit higher up in the call stack one or the other is selected based on the type of library loaded, and the engine programmer doesn’t have to care which one is used. Similarly, on the mod library side, clientTick() looks the same with both a dll and a wasm module, simplifying things.
Calling C++ from Zig
The public API of a mod library rarely changes, meaning the set of Zig functions marked with export rarely changes. However, the API of the core engine library, meaning the set of C++ core engine functions exposed to the Zig library, is not only larger but tends to get updated much more frequently. Because of this I have a code generator which I use to generate both the C++ side as well as the Zig side of the API. The code generator is fed a simple IDL (interface definition language) and it does its best to translate types between C++ and Zig. The generator only handles the dll side, meaning the wasm bindings have to be written by hand for now. I won’t go into further detail here, maybe in a future blog post, but you can look at the generated code in the Modding SDK GitHub repository.
I think the best way to describe how the bindings work is to look at an example: The GameObject::getName() method which returns a string containing the full name of an object in C++. Obviously we cannot call this method directly from Zig as the Zig code doesn’t know anything about C++ classes, so instead we have a wrapper type representing a C++ GameObject pointer:
|
|
Types ending with “Ptr”, such as GameObjectPtr above, in the Basis Zig API typically means that the type represents a pointer to something on the C++ side.
The getName() function passes the C++ raw pointer as well as a pointer to an InteropString to the C++ side, and the interop string gets filled with the name of the object. The InteropString type is a small extern struct with a pointer and a length, so basically a Zig slice which can be used directly with the C/C++ side.
Note also that the function returns a const slice of u8 (ie. an idiomatic Zig string) which only points to the data. It doesn’t own it. So if the user holds onto the return value and the underlying data is deleted there will be issues.
Let’s take a look at basis.bindings.api.GameObject_getName() , which is called from getName() above, next:
|
|
We can see that the code splits into two paths depending on the type of library we are building. We use the compile-time constant isWasm to insert either the wasm or the dll code path. The native code path (else case) is easy so let’s get that out of the way. The binding code generator generates the following:
|
|
Thus, the native path in GameObject_getName() only has to call the function pointer in _GameObject_getName to get the string value from C++. It also means that the returned u8 slice will point to data that lives in C++ memory. This is important to remember because the data might get deleted, as noted above, but also because it is not allowed in wasm. Remember, the wasm module cannot read or write memory not explicitly made available to it so we have to do something else. Let’s zoom in on the wasm code path in GameObject_getName() :
|
|
We are using a WASM-only piece of temporary storage to get a buffer which we then pass to the C++ side, asking it to write the string value to the buffer. We then set the interop string to point to that buffer. This is allowed because the temporary storage was allocated by the wasm module, and thus we don’t violate any security checks. The C++ code is obviously free to read/write to any memory, whether it is wasm-accessible or not. To finish up, let’s look at the C++ side of the getName() binding, both dll and wasm versions:
|
|
We can see that the dll version simply assigns the pointer to the string, while the wasm version needs to memcpy() it into the provided buffer. I chose this particular example exactly because of the difference in how memory is handled between native and wasm builds. The vast majority of bound functionality simply pass parameters and return values by value, and can thus use the same logic for both versions.
Isn’t this terribly slow?
When I started working on the wasm support I was afraid it would become too slow, not to mention that we are crossing dll boundaries and calling functions through function pointers even without any mods loaded, but so far none of the gameplay code has ever really shown up in my profilers. I’m sure if you load hundreds of wasm mods you’ll start to see some overhead from the binding system, so it’s something to keep an eye on, but right now engine level features such as the renderer and physics sim are clearly more important to focus on performance-wise.
Implementation challenges
I’d like to highlight a few challenges that came up during the modding support work, particularily with the wasm support: support for 64-bit wasm, and multithreading in the wasm module.
64-bit wasm (or lack thereof)
When I started working on the wasm support, the Memory64 wasm extension had only limited support out in the wild. I don’t honestly remember if the issue was with Zig or WAMR (or both) but I got 32-bit wasm modules building/running almost immediately while 64-bit modules had a bunch of issues.
In the end I decided to wait for better 64-bit support and use 32-bit wasm modules for now. This is an interesting situation to be in, because Traction Point is a 64-bit program. Because of this I needed to be very explicit with the different kinds of pointers flowing to and from the mod library, since some of them would either be 32 or 64-bit while others (such as a pointer to a game object living in C++) would always be 64-bit.
To make my life a little easier I added type aliases for different kinds of “int pointers”.
|
|
Notice how IntPtr is of type usize , the size of which is determined by the pointer size of the module/binary, while CppPtr is u64 , ie. always 64-bit. It is highly possible that the issues with 64-bit have been resolved as I am writing this, and I should take another look at compiling the wasm modules in 64-bit mode.
Wasm multithreading (or lack thereof)
Much like the 64-bit issue, threading was originally an issue with the wasm modules. By default, the Basis game engine runs the client and server on different threads and I kept getting crashes inside the wasm runtime whenever I tried to run the game. At the time, threading in wasm was heavily tied to WASI-threads (which makes sense because it would be the default way to create threads in wasm) but I was never interested in using WASI since my game engine provides everything the mods need to work.
WASI (WebAssembly System Interface) is a mechanism which allows the wasm runtime to expose system-level functionality to a wasm module, making it possible to open files, network connections etc. using standard APIs from inside the wasm module. Traction Point does not use WASI as the game engine provides everything the wasm module needs.
However, disabling WASI in the runtime seemed to disable threading altogether making the wasm modules completely single-threaded. After scratching my head for a day or two I decided the easiest way to support running the client and the server on different threads is to give each one their own module and let them run in single-threaded mode. After all, having the client and server poke at shared global memory is most likely a programmer error anyway and is to be avoided.
Because of this, dll mods and wasm mods treat global memory differently as the client and server share the same memory space in dll mods, while each have their own in wasm mods. This is also why the wasm mods have “per-module” data (as seen in the clientTick() example above).
Just like with the 64-bit issue, some (or all) of these issues might be resolved now and I could run both client and server in the same module.
So, did using WebAssembly work out?
Yes it did! The game now loads only wasm mods by default (dll mods can still be useful, more on that below) and the wasm runtime makes sure the code is properly sandboxed. There are still things to look into though. Running mods as wasm modules comes with a little bit of overhead, but WAMR supports ahead-of-time compilation of the wasm module into a more optimal format without sacrificing security, so that might be something to look at.
What is available now?
Well first of all, Traction Point is not released yet. If you want to try out a pre-release version (with modding support) you can join the Madrigal Games discord server to get a Steam playtest key. There will be a public demo, most likely also with modding support, later in 2026.
If you are interested in looking at some example mods and their code, check out the Traction Point Modding GitHub page. There are docs for how to get started. If you are more interested in the engine Zig code, check out the The Basis modding SDK.
As for the current state of the API, about 60-70 percent of the API is exposed to wasm. That means that using certain functionality might give you a compile error, like so:
|
|
Not all of the API will get exposed to wasm but I aim to have about 80-90% of it usable from wasm mods. In the meantime you can build your mods as dlls and bug me on Discord if you need more functionality exposed. The ability to develop using native dll mods also lets you step through your mod code in a debugger which can be of great help.
However, keep in mind that dll mods might not be allowed in the final game release. At the moment dll mods are forbidden by default but players can opt-in from the mod manager. On the Steam Workshop, dll mods may or may not be supported. That remains to be seen.
Let’s see some mods!
We have a few example mods on the github page. These are open-source, both the code and the data, and you can use them as starting points for your own mods. See the docs for how to get started. Let’s look at one of the mods in a bit more detail here, to give you an idea of what goes into making one of these things: The flying scout mod.
The flying scout mod is a good example to look at as it contains both code and data. The mod adds a new vehicle type to the game, or rather it takes the scout, an already existing vehicle, and adds a jetpack to it allowing it to hover and fly! Does it completely break the story campaign? Sure! Does it matter? Not at all!
Code overview
Let’s take a quick look at the code for the jetpack component, starting with the main ScoutJetPackComponent.zig file. I’ve shortened the code a little bit and added some additional comments. See the source repository for the full code.
|
|
The above component is registered with the engine and can be referred to using the registration name: "flyingscout.ScoutJetPackComponent" . The component uses a special effect for the jet engine thruster flames, the code for which is found in thruster_flame.zig
|
|
The rest of the mod code is supporting code, registering the component type, loading the audio resources and things like that. Again, check out the repository for the full code, and perhaps build it yourself!
The rest of the mod
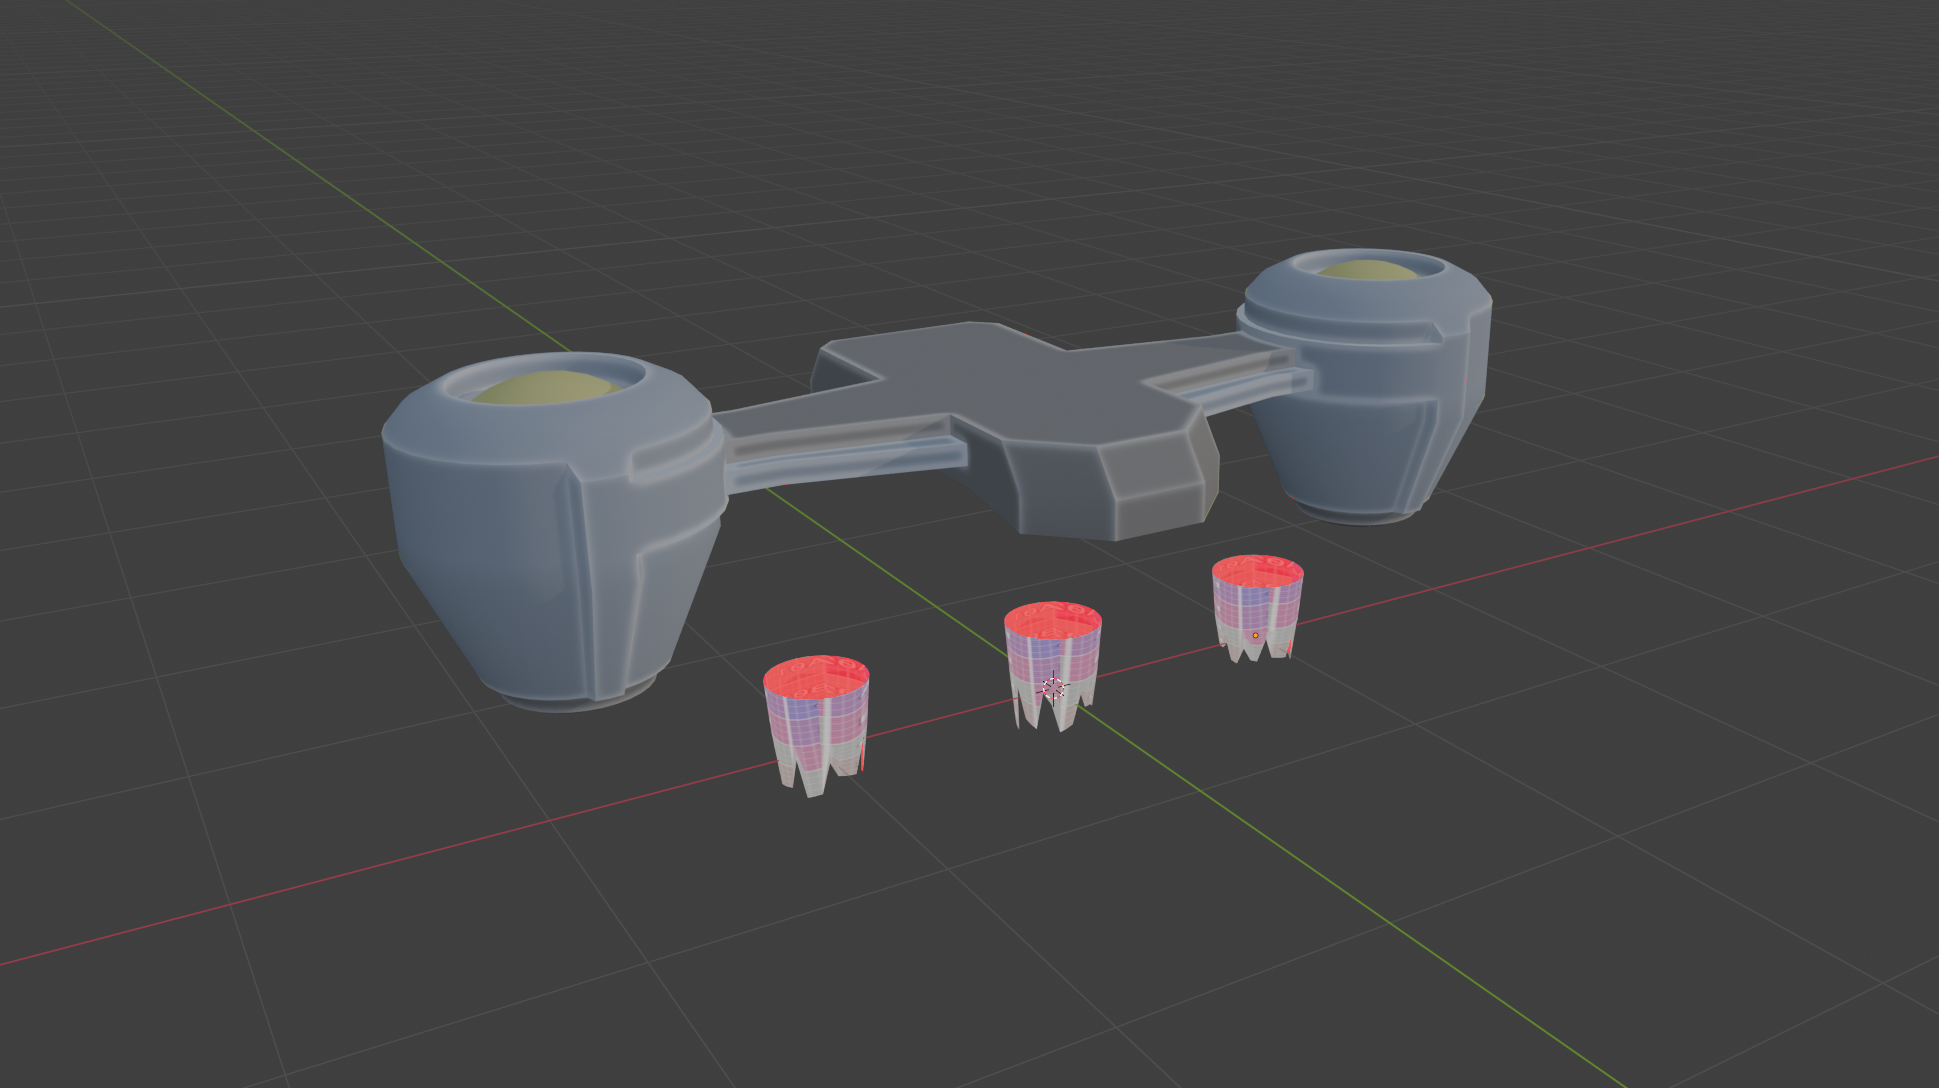
This blog post is about Zig and wasm so I am not going to go too deeply into the data/design side, but we have a few interesting things bundled with the mod. We have the meshes for the jetpack itself as well as three thruster flame meshes.
The jetpack has its own material which is also part of the mod, while the truster flames use a material already found in the base game’s resources. The ThrusterFlame struct above creates an instance of each mesh and switch their visibility over time creating a stylized flame effect.
Then we have the node graph for the jet engine sound. The screenshot in Image 6 is from my audio authoring tool called Timbre, which you can try for yourself. We combine an actual recording of turbine whine with a couple of layers of generated noise, increase the distortion with the thrust and adjust which frequencies pass through, and finally mix it all together.
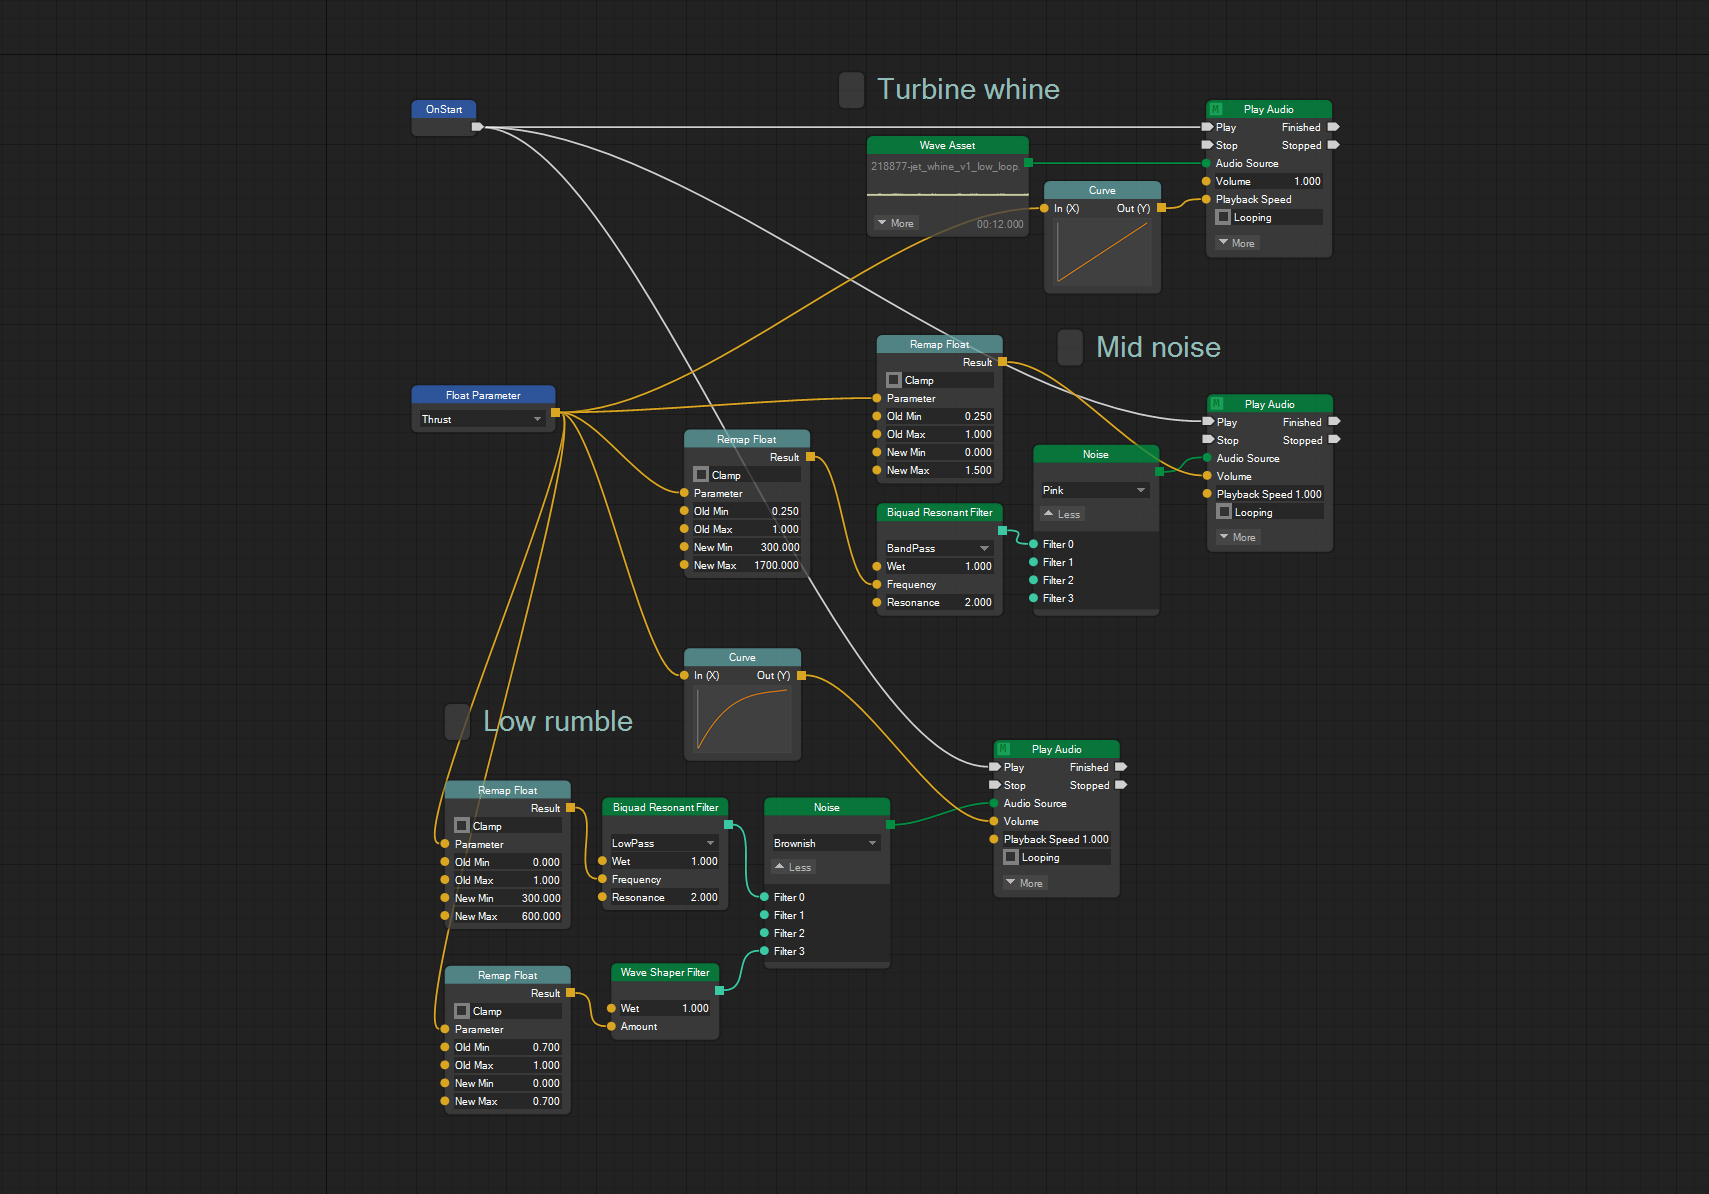
The lower blue node on the left is the “Thrust” float parameter which is set from the code above (ScoutJetPackComponent.zig, line 134). This way, the sound reacts to changes happening in the game world in real-time as it is playing.
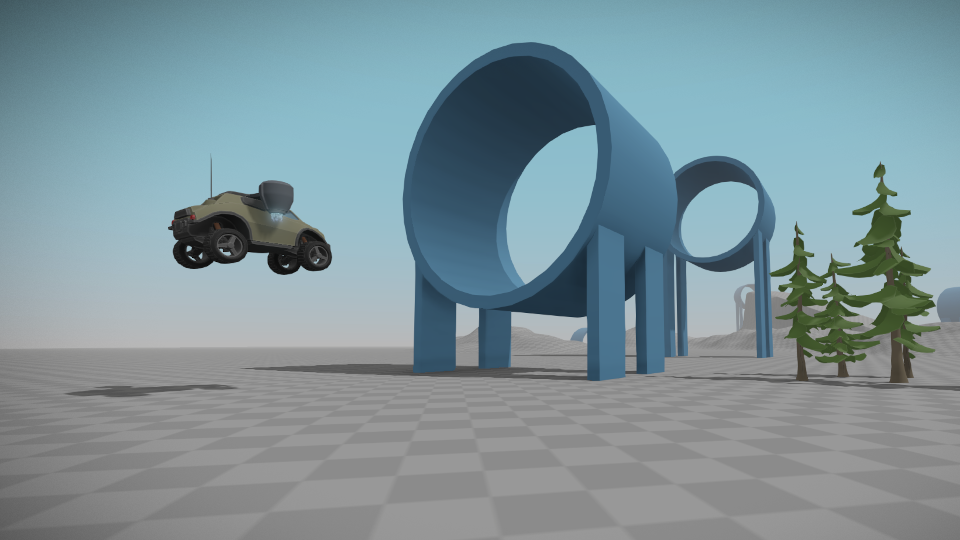
Finally, the mod comes with a small test level which has you flying through blue rings/gates to practice your flying. I intentionally left the jetpack a little tricky to use by limiting the thrust vector to straight down, since the intention is not to make a flight simulator. That means that, while hovering in the air is easy, if you want to fly forward you have to gather speed on the ground and only apply jet engine thrust when you have your desired horizontal velocity. It makes for a fun, albeit chaotic, gameplay experience :) If you want to try out the level in the game, you can find it in the Sandbox menu once the mod has been loaded.
The jet engine sound effect and the test level were actually designed live on stream, so check that out if it looks interesting. (And do note that live streams have since moved to another channel).
Conclusion
Overall I am very happy with how the modding system turned out. When I originally chose to write the game in Zig I wasn’t really thinking about adding support for mods, so I am glad to see the language supporting all of this despite it not being planned far in advance. The game is still in production of course, so you never know what issues might still arise, but so far things have been working out remarkably well.
If you think this looks cool, give it a go and let me know on Discord what weird and wonderful mod creations you have made!